top of page
How to connect your device
1. Plug your device into your RGB Strips with the 3 prong connector.
Note:
You must connect your controller to a 2.4GHz WiFi network. If you don't have a 2.4GHz network set-up, see your router settings on how to set-up a 2.4GHz network option.
2. Plug the 5v power supply into the LightWave controller. Do not use a power supply greater than 5v.
3. Once the device powers up, navigate to WiFi settings on your smartphone or WiFi enable PC and browse for "Brynic LED Controller" and select it.

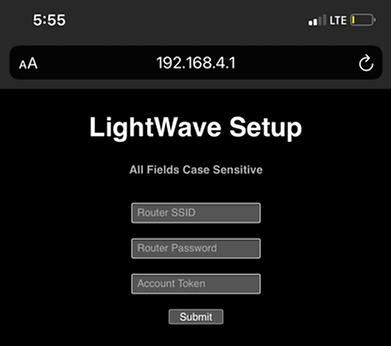
4. Once connected to the "Brynic LED Controller" network, navigate to your smartphone browser and enter 192.168.4.1 into the search bar and hit enter.

5. You should then reach a "LightWave Setup" page. You will be prompted to enter your Router SSID (WiFi network name), your Router Password (WiFi password), and your Account Token. Your Account Token will be your access code, and you'll want this code to be as secure as possible. We recommend creating a unique password that you will remember and will not be guessed easily. Special characters are recommended. Make sure you are connecting to a 2.4GHz network.
Click "Submit"
6. You should then receive the following message: "Sent login info and restarted controller! AP Connection will re-open if connection to router fails."

7. You now have connected your device to your router. Return to the LightWave Control page and enter your Account Token to begin customizing your LightWave light strip or Brynic sign.
bottom of page